Use the RJE
Configuration Utility to configure BARR/RJE settings for host communication.
The procedures outlined in this topic are optional and designed for more
advanced BARR/RJE users. Refer to the Configuring BARR/RJE required settings
for 802.2 LLC2, HPR/IP,
SDLC, or MS/LUA
topic to configure the minimum required BARR/RJE settings.
You must be a member of the local Administrators
group to operate the RJE Configuration Utility. If you are assigned the
Configure - RJEuser
access right on the computer to which you are trying to connect, but
are not a member of the Administrators
group, the RJE Configuration Utility will operate in read-only mode.
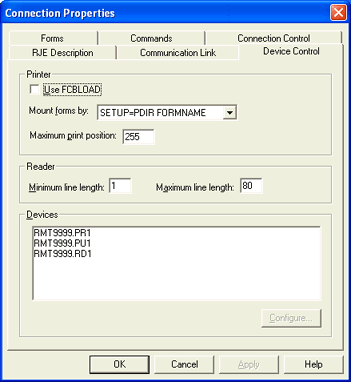
Under Printers,
choose whether to enable FCBLOAD.
The FCB contains information used to format the data at print time.
By default, this option is not selected.
From the Mount
forms by list, choose
which method the software will use to obtain form information for a file.
The options that display change depending on the Use
FCBLOAD selection. If Use FCBLOAD
is selected, the list is limited to $HASP190
FORMNAME (default), RJE Console,
and $HASPFCBNAME.
If Use FCBLOAD is not selected,
the Mount forms by list also includes
SETUP=PDIR FORMNAME (default)
and SETUP=PDIR FCBNAME.
The RJE
Console choice is the only manual way to load forms. The other
choices are ways to automatically load forms, usually during unattended
operation.
Specify the Maximum
print position on a line. If characters on a line exceed the specified
maximum, the software will wrap the extra characters to the next line
as the file is received to the computer.
Specify the Minimum
line length of data lines that will be sent on the reader. Any
data lines shorter than the minimum line length will be padded with blanks
to the specified length. Valid values are 1 to 254.
Specify
the Maximum line length of data lines that will be sent on the reader.
Valid values are 1 to 254.
If you are sending
print files to another SNA RJE remote unit, set this value to 132
so that all 132 columns of your print file are sent.
Under Devices,
select the appropriate printer or punch and click Configure.
The Device Properties dialog
box displays.
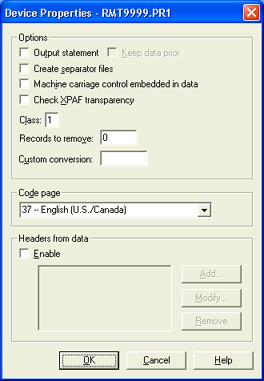
We do not recommend using the Output
statement and Headers from data
options together. If you want to use both of these options, however, select
your settings carefully.
Select whether you want
to use the Output statement to
provide information typically used for printing a file, such as job name,
form name, file name, copies, priority, and class. The output statement
must only be used for Standard ASCII and ASCII with ASA carriage control
files. Output statements must be in all uppercase or all lowercase. Mixed
case is not supported.
If you select Output
statement, all lines up to and including the output statement are
deleted from the file. Select Keep data
prior to prevent data loss.
Select Create
separator files if you want to create separator files and divide
an output file into multiple files by using PDIRs Acronym for Peripheral Data set
Information Record(s).
as file boundaries. This feature is only available for printers and punches.
Select Machine
carriage control embedded in data to allow the software to use
the first byte of every record as machine carriage control, instead of
SCS carriage control sent by the host. This is option is similar to the
Machine Carriage Control switch in the S/370 Receive mode in RJE DOS product..
Specify the output Class to assign to a file received on
a specified source device.
Specify the number of Records to remove. With
this option you can delete a specified number of records from the beginning
of the file. The maximum value is 32767. A common use for this option
is to delete the first two records of a punch file: the blank card and
the file separator card.
If needed, select a Code page
from the drop-down list. Typically, you do not need to use a code
page. Code pages are required only for special programs or printing needs,
such as for printing foreign character sets.
Under Headers
from data, select Enable
if you want to extract information from the file text and save it in the
spool header. To add a new field, click Add.
To view or modify a field, select a field from the list and click Modify. Use the Headers
From Data Configuration dialog box to enter configuration information.
To remove a field, select a field from the list and click Remove.
When you finish configuring
the connection, click OK. If you
created a reader on the RJE Description
tab, a dialog displays asking if you would like the RJE Configuration
Utility to automatically create the RJE readers needed for communicating
with the host. We recommend selecting Yes
and allowing BARR/RJE to create the following necessary devices. You must
restart the BARR
SpoolCore service for your changes to take effect.
To route files from
a program to the Spool Window, the printer Connection
name - Send to Host is created. This allows you to print directly
from a program by selecting File | Print
on the menu bar.
To route files from
the Spool Window to the host, a spool printer is created for each reader
specified. These printers appear in the Spool Window with the name Connection name - RDn.
After the BARR SpoolCore service is restarted, you can view the newly
created printers.
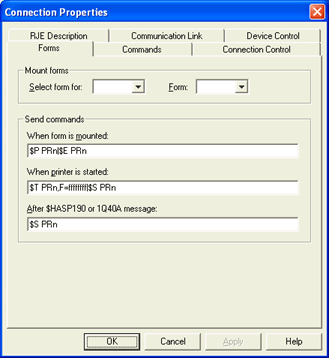
Selecting forms
Complete the following steps to select a form for an RJE print stream
(PR1 to PR7).
From the Select
form for list, select the printer on which you want to mount
forms.
From
the Forms
list, select the form you are going to mount on the printer.
Under Send
commands, specify the commands you want automatically sent to the
host computer. These commands help control the printing of jobs that need
forms. If your host computer requires form commands and you do not enter
them here, you must send
commands manually from the RJE Console.
In
the When form is mounted box, type the command
you want to send when the form is mounted. Usually you enter this type
of command to drain or pause the RJE print stream. This stops file activity
so additional commands can be issued. You
can enter multiple commands separated by vertical bars.
In the When
printer is started box, type
the command you want to start
the RJE print stream. Usually you enter this type of command to tell the
host computer to release jobs that require the mounted form. You can enter multiple commands
separated by vertical bars.
In the After
$HASP190 message box, type the command
you want to send after BARR/RJE receives a JES2 $HASP190 message. This
message is used for automatic forms mounting. With this command line you
can issue the appropriate start printer command in response to the setup
message. For JES2, the start command usually is
$S PRn.
If you do not use the JES2 $HASP190 message you can leave this line blank.
You can enter
only one command in this box. Multiple commands separated by vertical
bars are not supported.
When you finish configuring
the connection, click OK. If you
created a reader on the RJE Description
tab, a dialog displays asking if you would like the RJE Configuration
Utility to automatically create the RJE readers needed for communicating
with the host. We recommend selecting Yes
and allowing BARR/RJE to create the following necessary devices. You must
restart the BARR
SpoolCore service for your changes to take effect.
To route files from
a program to the Spool Window, the printer Connection
name - Send to Host is created. This allows you to print directly
from a program by selecting File | Print
on the menu bar.
To route files from
the Spool Window to the host, a spool printer is created for each reader
specified. These printers appear in the Spool Window with the name Connection name - RDn.
After the BARR SpoolCore service is restarted, you can view the newly
created printers.
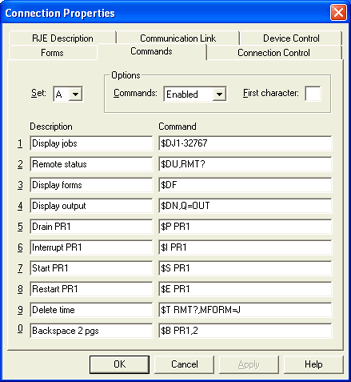
Defining command buttons
Complete the following steps to define the command
buttons that appear on the RJE
Console. These buttons can be used to send
commands to the host to display and change the status of devices, jobs,
and print and punch queues.
The command buttons have already been defined with frequently
used JES2 commands, but you can change the definitions if necessary. You
must change the remote number in the A2 and A9 key default definitions
to correspond to your remote number. (Get the remote number from your
host programmer.)
Select the RJE Configuration
Utility's Commands tab.
In the Set box, select the letter
to which you will be assigning commands. You can assign up to 40
commands.
In the Description box, type a description to remind you of
the command's function. Descriptions can contain a maximum of 15 characters.
In the Command
box, type the command that you want sent to the host when you use the
command button on the RJE Console. You can enter multiple commands separated
by vertical bars.
You can define
80-character commands that prompt you to supply parameters when you use
the command. This feature allows you to define fewer buttons because you
can use a single button to issue similar commands. When you define the
command, substitute a question mark (?) for the value you want to supply
later.
Choose to Enable
or Disable
manual commands entered in the RJE
ConsoleCommand line. Disable
this option if you want to restrict computer operators to using defined
command buttons. This feature prevents users from sending unauthorized
or undesirable commands.
If you include
? prompts in your command button definitions, operators can send commands
to the host, even when you disable console commands. When operators use
a command button defined with a ? prompt, the command displays in the
Command line. The operator can
modify the command or enter a new command from scratch. If you want to
eliminate this possibility, do not include ? prompts in your command definitions.
You can specify the First character of the command so you
do not need to enter it each time you issue a command. Commands for the
host computer begin with a command character (for example, JES2 commands
begin with a $). When you use the RJE
ConsoleCommand line,the software automatically adds the
specified character to the beginning of each command you issue automatically
with the command buttons or manually from the Command
line.
When you finish configuring
the connection, click OK. If you
created a reader on the RJE Description
tab, a dialog displays asking if you would like the RJE Configuration
Utility to automatically create the RJE readers needed for communicating
with the host. We recommend selecting Yes
and allowing BARR/RJE to create the following necessary devices. You must
restart the BARR
SpoolCore service for your changes to take effect.
To route files from
a program to the Spool Window, the printer Connection
name - Send to Host is created. This allows you to print directly
from a program by selecting File | Print
on the menu bar.
To route files from
the Spool Window to the host, a spool printer is created for each reader
specified. These printers appear in the Spool Window with the name Connection name - RDn.
After the BARR SpoolCore service is restarted, you can view the newly
created printers.
Managing connections
Complete the following steps to specify startup and restart options.
Choose if you would like
to automatically connect to the host computer.
If you are sending
files to the host, you must use the Spool Window scheduling
option to release the jobs from spool. If you do not use the scheduling
option, you will connect to the host when a job reaches the spool and
it will be released immediately, ignoring the specified time.
Select At
RJE service startup to automatically connect to the host computer
when the BARR RJE
service starts.
SDLC
Connections: Only one connection per SDLC link service can be configured
to auto connect at BARR RJE service startup.
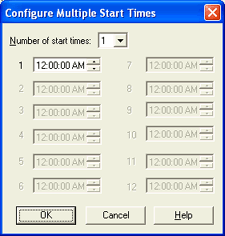
Select At
time, and then click Configure
to enter start times on the Configure
Multiple Start Times dialog box. This option is useful for unattended
operation. It is especially useful when you are connecting to the host
computer after normal business hours to take advantage of lower communications
charges.
Before leaving
the software unattended, you must start
a new connection or restart the current connection on the RJE Console.
Starting this connection will not connect you to the host, the software
will wait until the indicated time to start the host connection. A message
will appear on the console indicating the actual connection start time.
You can close the RJE Console
if desired. If you want to connect prior to the selected time, you can
start the connection manually.
Specify the Maximum
log file size. The log file is stored in the \\Program Files\
Common Files\Barr\Log
folder and is named ConnectionName_ConsoleLog.txt.
Select the action the software
will take when a restart condition occurs.
Select Disconnect
if idle if you want the software to automatically disconnect To break a communications link.
from the host computer when the communication line becomes idle for a
specified period of time.
Use Disconnect
if idle with At time when
you are connecting to the host computer after normal business hours to
take advantage of lower communications charges.
Select Reconnect
periodically if you want to
reconnect to the host computer at specified time intervals after it disconnects.
Select Disconnect
unconditionally to force
the software to exit after a manual disconnect or after idle time is exceeded,
even if processes are not complete.
In the Commands
sent at startup box, enter commands that you want to be issued
when the connection is started. If you have selected
a default connection in RJE Console, the commands will be sent to the
host computer each time RJE
Console starts. Commands can contain up to 80 characters each.
You can enter several commands on each line if you
separate the commands with a vertical bar (|). You can also separate commands
by pressing CTRL+ENTER,
and moving the pointer to the next line.
Click Startup
Text to enter information that you want to display on the RJE Console
startup screen.
When you finish configuring
the connection, click OK. If you
created a reader on the RJE Description
tab, a dialog displays asking if you would like the RJE Configuration
Utility to automatically create the RJE readers needed for communicating
with the host. We recommend selecting Yes
and allowing BARR/RJE to create the following necessary devices. Change
the state of all printers in the Spool
Window to Disabled before BARR/RJE creates the devices. Once the readers
have been created, you must restart
the BARR SpoolCore service for your changes to take effect. If you select
No, you will need to manually
configure the RJE readers.
To route files from
a program to the Spool Window, the printer Connection
name - Send to Host is created. This allows you to print directly
from a program by selecting File | Print
on the menu bar.
To route files from
the Spool Window to the host, a spool printer is created for each reader
specified. These printers appear in the Spool Window with the name Connection name - RDn.
After the BARR SpoolCore service is restarted, you can view the newly
created printers.
 You must be a member of the local Administrators
group to operate the RJE Configuration Utility. If you are assigned the
Configure - RJE user
access right on the computer to which you are trying to connect, but
are not a member of the Administrators
group, the RJE Configuration Utility will operate in read-only mode.
You must be a member of the local Administrators
group to operate the RJE Configuration Utility. If you are assigned the
Configure - RJE user
access right on the computer to which you are trying to connect, but
are not a member of the Administrators
group, the RJE Configuration Utility will operate in read-only mode.

 You can define
80-character commands that prompt you to supply parameters when you use
the command. This feature allows you to define fewer buttons because you
can use a single button to issue similar commands. When you define the
command, substitute a question mark (?) for the value you want to supply
later.
You can define
80-character commands that prompt you to supply parameters when you use
the command. This feature allows you to define fewer buttons because you
can use a single button to issue similar commands. When you define the
command, substitute a question mark (?) for the value you want to supply
later.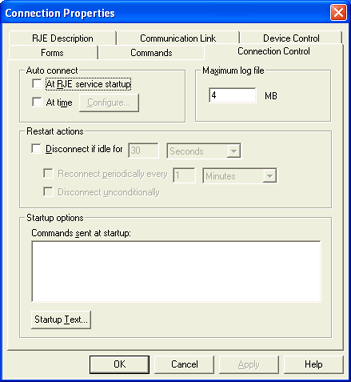
 Use
Use