You can use the Encryption Key Manager to encrypt data passed between Barr Enterprise Print Server computers so that only the transmitter and intended recipient can decode the message. Encryption ensures the privacy and authenticity of the message as well as the integrity of the message contents.

The Barr Enterprise Print Server generally uses AES (Rijndael), a fast, robust encryption algorithm, with data compression and decompression. Compressing data before encryption eliminates redundant data and improves the robustness of the encryption. It also improves efficiency because there is less data to encrypt and transfer. At the receiving end, the data is decrypted and then decompressed.
AES relies on two identical keys, installed on each end of the link. Each computer has a key that it can use to encrypt a packet of information before it is sent over the network to another computer. You can use the Encryption Key Manager to name the key and assign a pass phrase on the first Barr computer. On the second Barr computer, use the Encryption Key Manager to define the same name and pass phrase.
To use the Encryption Key Manager, you must be a member of the local Administrators group.
Complete the following steps to configure encryption.'
Before you begin, you must create an encryption key. The same name and pass phrase must be used on both the sending and receiving Barr Enterprise Print Server computer.
Open the Encryption Key Manager. (Open Windows Explorer. Navigate to the directory where the Barr software is installed, select the Spooler folder, the Exe folder, and double-click EncryptionKeyManager.exe. The default directory is \\Program Files\Barr\Spooler\Exe, unless an alternate path was specified during installation.)
Create a Name for your key.
Enter a Pass phrase. The pass phrase can not exceed 32 characters.
Click Add. The tool will generate a random key based on the pass phrase, and then encrypt the key and store it in the registry. The pass phrase is never re-displayed once it is entered and Add is clicked.
Repeat steps 1 through 4 on the second Barr Enterprise Print Server computer. Ideally the same person will install the keys on the second computer. Where this is not possible, the pass phrase for the key should be communicated by a secure method, so a person can install the key at the remote location without risk of identifying the key.
You can only encrypt data that is being sent to another Barr Enterprise Print Server computer. You can only decrypt data that you receive from another Barr Enterprise Print Server computer.
Open the Configuration Utility.
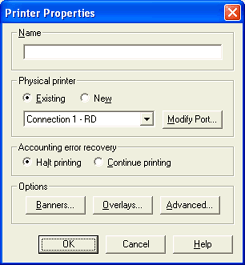
From the Spool Printers tab, click Add. The Printer Properties dialog box displays.

In the Name box, enter a printer name. The printer name cannot contain a backslash '\'. This name displays in the Spool Window’s printer list and is called the spool printer.
Under Physical printer, select New. From the drop-down list, select Route to another BARR/SPOOL.
Under Options, click Advanced to specify advanced printer options. The Advanced Printer Options dialog box displays.
Select Pass the archive format to LPR port. Click OK to save your changes.
Add a file to the Spool Window using Print Utility. Under File type on the Format tab, verify you have select the Barr Archive.
Add the Encryption Key Name column to the Spool Window. This field, NDHBKEYN, is contained in the Data Set Header Internal Custom section.
In the Spool Window under the Encryption Key Name column for your job, enter the key name specified when you created the encryption key.
Set the routing criteria to match and print the document.
Open the BARR/PRINT TCP/IP Configuration utility.
From the LPD tab, click Add | Queue. The Queue Name dialog box displays.
Specify the queue Name and click OK. The File Properties dialog box displays with the <Default> LPR control file command selected. By default, each queue contains a <Default> command and it must be configured before adding any additional commands. This command can be modified, but not removed.
Once the <Default> command has been configured, from the LPD tab, select the queue and click Add | LPR Command.
Select x -- Extended LPR command from the drop-down list and enter Barr in the Type box. The command you choose must match the command you selected when you configured the BARR/LPR port. You can select a different command, as long as it matches in both LPR and LPD configurations.
Click OK. The Input Conversion Utility displays.
On the Format tab, select the Barr archive file type.
Select Decrypt and enter the Key name specified in the Encryption Key Manager. Click OK.
Click OK to close the utility.