 To add a Windows printer, you must be a member of the Administrators group. If you are using
Windows 2000, you can also be a member of the Printer
Operators or Server Operators
group or a Power User on a workstation.
To add a Windows printer, you must be a member of the Administrators group. If you are using
Windows 2000, you can also be a member of the Printer
Operators or Server Operators
group or a Power User on a workstation.Complete the following steps to define a Windows printer to receive line or channel printer jobs into the spool.
To add a Windows printer, you must be a member of the Administrators group. If you are using
Windows 2000, you can also be a member of the Printer
Operators or Server Operators
group or a Power User on a workstation.
Open the Windows Add Printer Wizard.
Select to define a local printer. Click Next.
Create a new port selecting the Barr Spool Port.
Enter the Port
name. Click OK, and then
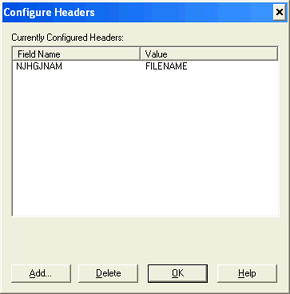
click Next. The Configure
Headers dialog box displays. 
 Include the port type and number in the
port name so you can easily identify the ports later. To group all the
Barr ports together in the ports list, include Barr
as the first word of each port name.
Include the port type and number in the
port name so you can easily identify the ports later. To group all the
Barr ports together in the ports list, include Barr
as the first word of each port name.
If you defined a printer that uses a Barr Spool port, you can preset the header field values for incoming spool files. Files routed to the spool with that spool port are assigned the specified header field values. The following table lists fields that users commonly want to preset and their location in the header. Configure the header field values, and then click OK. If you do not want to assign default values, click OK.
|
Description |
Section |
Field Name |
|
Job name |
Job Header General Section |
|
|
Form name |
Data Set Header General Section |
|
|
FCB name |
Data Set Header General Section |
|
|
Class |
Data Set Header General Section |
|
|
Dest device |
Data Set Header General Section |
|
|
Priority |
Job Header General Section |
|
|
Copies |
Job Header General Section |
By default, the Job name (NJHGJNAM) field is assigned
the FILENAME attribute. This will automatically store the document name
as the job name.
In the Manufacturers list, select Barr. In the Printers list, select the Barr EBCDIC - Printer Driver printer driver. Click Next.
Select Keep existing driver. Click Next.
Enter the Printer name as you want it to appear in the Windows Printers folder. Select No to indicate that this printer will not be used as the default Windows-based printer. Click Next.
Choose a name
that helps you identify this Windows printer as one that receives jobs
intended for line printers, such as Input for line printers.
Choose whether or not this printer will be shared with other network users. If this printer will be shared, you will need to type a share name. Click Next.
To set up a printer for sharing, the printer
and users who will access it must be in the same domain. You must assign
corresponding printer permissions from the Security
tab of the shared printer’s Properties
dialog box.
Choose whether or not to print a test page. Click Finish. The new Windows printer displays in the Printers folder. To define another printer, open the Printers folder and select Add Printers.
Enable the 'Print directly to the printer' setting.
