Working with banners

Configuration Utility

You can set up spool printers to automatically send headers and trailers for each job.

See also:


Selecting banners

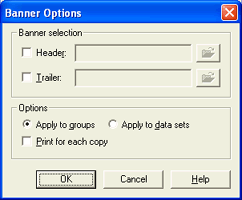
If you are using print banner or trailer pages, specify the header and trailer files. These steps assume you are at the Printer Properties dialog box. This dialog box displays when you add or modify a printer from the Configuration Utility's Spool Printers tab.

  1. From the Printer Properties dialog box, under Options, click Banners. The Banner Options dialog box displays.

    Banner Options Dialog Box

  2. Select the check box next to Header or Trailer.

  3. Click the folder button.

  4. Select the desired header or trailer file.

  5. Click Open. The name of the selected header or trailer displays in the text box.

  6. Select to Apply to groups or Apply to data sets.

  7. Choose whether or not you would like to send a banner page with each copy of the printed document. If you send a trailer with the job, a page break will be inserted before the trailer. This affects all data formats that include page breaks. However, if a page break exists at the end of the job, a second page break will not be added.

  8. Click OK.

Removing banners

Remove the banners or trailers for a spool printer on the Banner Options dialog box. These steps assume you are at the Printer Properties dialog box. This dialog box displays when you add or modify a printer from the Configuration Utility's Spool Printers tab.

  1. From the Printer Properties dialog box, under Options, click Banners. The Banner Options dialog box displays.

  2. Clear the check box next to Header or Trailer.

  3. Click OK.