Follow the steps below to install and configure BARR/TRANSFORM for the first time. The steps below assume that you have already installed the Barr Enterprise Print Server. Once these steps are complete, you can start using the features of BARR/TRANSFORM (ADEPT Suite), such as viewing or printing selective page ranges of Xerox jobs.
Copy the resources to your computer
Normalize the Xerox jobs (optional, not for AFP)
The setup program copies files from the ADEPT Suite CD to your computer.
Before you run the setup program, exit all Windows programs and make sure the hardware key is installed.
Insert the ADEPT Suite CD into the CD-ROM drive. The installation screen automatically displays. If auto run is disabled on your system or if the installation screen does not automatically display, right-click Start on the taskbar and select Explore. Navigate to the CD-ROM drive and double-click setup.exe.
Follow the instructions on the screen to install the software.
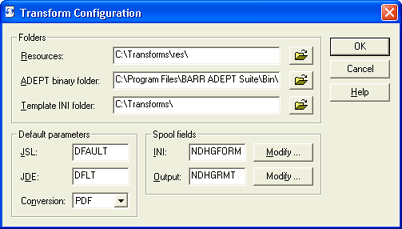
The Transform Configuration utility is used to configure the initial settings and the default values for interpreting Xerox jobs. Use the utility after the transform software has been installed, but before copying the Xerox resources to your computer.
Open Windows Explorer.
Navigate to the folder where the Barr software is installed. The default folder is \\Program Files\Barr\Spooler\Exe, unless an alternate path was specified during installation.
Double-click TransformationConfiguration.exe. The Transformation Configuration dialog box displays.

Review the settings under Folders. In most cases, the default settings will apply.
Select the Conversion format. The information contained in the INI file is used to generate that stream’s equivalent in one of the following formats, HTML, PCL, PDF, PDL, PostScript, TIFF, TXT, or XML. Each transformation output type is separately licensed. The default format is PDF. This parameter applies only to the BARR/TRANSFORM product.
Under Spool fields, specify which spool header fields (or document attribute fields) will be used to call different Xerox settings on a job-specific basis. The INI spool field parameter indicates that the specified spool header field (Form name by default) can be used to select an INI file other than the DEFAULT.INI. When the Barr software interprets a Xerox job, it will first look for an INI file that matches the name in this field. If it does not find an INI file with that name, it will use the DEFAULT.INI file.
Click OK. The utility will create a DEFAULT.INI file used to specify the Xerox settings. The INI file, along with the Xerox resources, will be stored in C:\Transforms, unless an alternate location was specified during configuration.
Any product that interprets or transforms Xerox legacy data streams (LCDS or Metacode) must use the same resources as the Xerox LPS printer. These resource files, which are typically stored on the Xerox printer, must be copied to the C:\Transforms\Res folder for use by the Barr software when interpreting Xerox jobs. The following resources are needed:
Job Source Libraries (.JSLs) – The JSL contains the primary information that specifies how the Xerox printer will print specific jobs. Although there may be many JSLs on the printer, typically just a few are used regularly. Because a JSL may refer to information in other JSLs, it’s important to make sure all JSLs are included. For example, it is common practice to code CME and PDE descriptions in separate, external JSLs rather than in the main JSL.
Forms, Fonts, Logos, and Images (.FRM, .FNT, LGO, .IMG) – These are specific resources called by the JSL and the JDEs. Forms also can include references to the other resources. Because it can be difficult to determine which resources are used by a specific job, it is much more efficient to gather all of the resources from the printer rather than trying to determine which ones are needed.
It is simple to copy the resources from the Xerox printer to disks using system commands from the Ready prompt on the Xerox controller. If the disks are not formatted for the Xerox operating system, use the FLOPPY INITIALIZE command to correctly format the disks. To copy the resources to a disk, use the following commands:
FLOPPY SAVE *.JSL
FLOPPY SAVE *.FRM
FLOPPY SAVE *.FNT
FLOPPY SAVE *.LGO
FLOPPY SAVE *.IMG
When one disk is full, the system will prompt you to insert another disk.
A standard collection of PCL fonts is provided with the Adept Suite.
Additional specialized fonts can be added to the standard folder, or the folder path can be reconfigured by the following INI entry:
[PCL]
PCLFontLibDir=C:\Program Files\BARR ADEPT Suite\PCL_Fonts\
For fully composed AFP data sets, additional resources are not typically needed. For mixed-mode AFP, a resource bundle and/or a formdef can be specified.
[AFP]
Formdef=F1abbb
;ResGroupFile=C:\Transforms\afpResources\bbb.res
ExtractAfpRes=Yes
DelExtractedAfpRes=No
UseFormdef=No
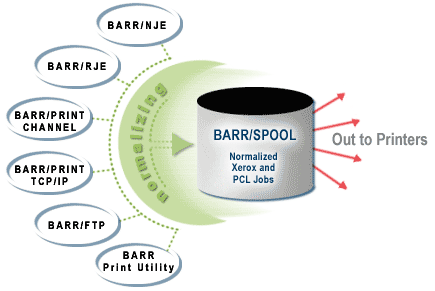
The normalizing utility reformats the jobs into page-oriented data with basic page indexing. This reformatting enables all the other features, such as printing selective page ranges, splitting the job, or gathering accurate accounting information.
Normalizing can occur manually or automatically. You can manually normalize the job by right-clicking the job in the Spool Window and selecting Tools | Normalize. Manually normalizing jobs works best when you occasionally need to reprint jobs, but in most cases, you want the Barr software to send the data to the printers.
If you intend to use accounting information or want to use BARR/PRINT SPLITTER, then you need to automate the normalizing process. You can configure each input type in the Barr Enterprise Print Server to normalize jobs as they arrive in the Spool Window.

Data can be configured to normalize automatically on input to the Spool Window
Normalizing can be enabled for specific input data streams by setting a single option for the specific input type. The following table shows where to set the normalizing option for each type of input.
|
Input Type |
Set Normalizing Option |
|
BARR/RJE or BARR/NJE |
By override tables |
|
BARR/PRINT TCP/IP (LPD) |
By queue |
|
BARR/PRINT TCP/IP (Socket) |
By socket |
|
BARR/PRINT CHANNEL |
By channel address |
|
Print Utility (input from disk) |
By folder |
Once you have determined which input you are using, modify the settings for that input to add a new document attribute from the Data Set Header Internal Custom section. The attribute is called Normalize the data set, and its value should be set to -1.
When the document is printed from the Spool Window, a combination of settings in the document and on the destination printer automatically trigger the transformation of data to other formats. To initiate the transformation process, the document and the printer must be configured as follows.
The data type of the document is dependent on the data stream. If the document has been normalized, the data type will have automatically been changed during the normalization process. Otherwise, change the data type by setting the document attributes on the input module or with an override table.
To verify the file format, add the Data Set Header Internal Custom Section, NDHBDTYP - Data type field to the Spool Window. To change the data type manually, just click in the Data Type column and type the correct format.
|
Data Stream |
Data Type |
NDHBDTYP |
|
AFP |
Binary raw AFP |
.afp .anj |
|
PCL |
Binary raw |
.pcl .pcn (normalized) |
|
Xerox |
S/370 VBM |
.lnj .lnj .xnj (normalized) |
|
Input Type |
Set Data Type |
|
BARR/RJE or BARR/NJE |
By override tables |
|
BARR/PRINT TCP/IP (LPD) |
By queue |
|
BARR/PRINT TCP/IP (Socket) |
By socket |
|
BARR/PRINT CHANNEL |
By override tables |
|
Print Utility (input from disk) |
By folder |
Before you configure a printer, you must first define one of the following types of output destinations. The Printer uses transform option on the Advanced Printer Options dialog box is now available for ADEPT Suite transforms. It allows the transform process to occur while the job is being printed, which facilitates a better utilization of printers.
Once the printer is created, use one of the following methods to configure the printer.
If you are connecting to a network printer or printing to a TCP/IP print queue, set the Pass data to printer without conversion option.
If you are writing to an IP socket or to disk, set the file format to Binary.