You access this dialog box when you perform manual and automatic spooling. From the Print Utility's Manual Spooling tab, click Settings to access this dialog box. Specify the settings from this dialog box before you send a file to the spool. You can also access this dialog from the Automatic Spooling tab by clicking Add or by selecting a folder and clicking Modify | Properties.
Click an option you want to learn more about.
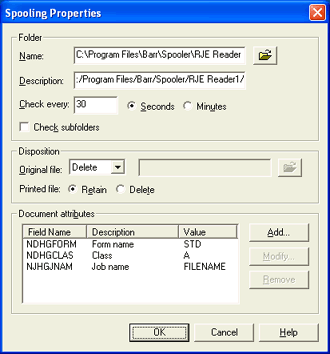
Name
Displays the path of the automatic spooling folder.
Description
The folder description that displays on the Automatic Spooling tab.
Check every
Specifies how often to check the selected folder for files. You can specify an interval of seconds or minutes.
Check subfolders
Specifies whether or not to check subfolders of the automatic spooling folders. You can create more than one level of subfolders, and Print Utility will check all subfolder levels.

Specify the file disposition after spooling and document disposition after printing from Print Utility. For manual spooling, set the disposition from the Manual Spooling tab. For automatic spooling, set the disposition from the Automatic Spooling tab.
Original file
Print Utility sends a file to the spool folder. You can choose what happens to the original file after Print Utility sends it to the spool. This status is called the file disposition. If there is a problem and the disposition processing cannot be completed during automatic spooling, a message will display in Operator Console, and the automatic spooling folder will be automatically disabled. Here are some example problems: trying to move a file to a folder that you don't have rights to and trying to write to a network drive when the network is down.
Leave – Does not delete or move the original file after sending it to the spool. For automatic spooling, this option causes the file to be sent repeatedly (once at each occurrence of the spooling interval) from the automatic spooling directory until you delete it.
Delete – Deletes the original file after sending it to the spool. The file is deleted from the folder you sent it from. For automatic spooling, files are also deleted from the automatic spooling folder after they are sent to the spool. This option is selected by default.
Move To – Saves the file in another folder after Print Utility sends it to the spool. If a file by the same name already exists in the folder, the new file will be saved with an incrementing number. For example, if file ABC is sent to a folder that already contains a file named ABC, the new file will be saved as ABC_001. Click the folder button to select the folder. See the Moving files to another folder topic for more information.
Move/Overwrite – Saves the file in another folder after Print Utility sends it to the spool. If a file by the same name already exists in the folder, the existing file will be replaced by the new file. Click the folder button to select the folder. See the Moving files to another folder topic for more information.
Printed file
When you send a file with Print Utility, you can choose what happens to the spool document after it prints. This status is called the spool document disposition.
Retain – Stores the spool document in the retain folder after it prints. You can manage retained files using the Retain Window. This option is selected by default.
Delete – Deletes the spool document from the spool folder after it prints.
The options under Document attributes are used to manage a list of fields in the header. Print Utility sets these fields to specified values before sending a copy of each file to the spool.
Field Name – Header field selected to be sent with the document.
Description – Description of the header field.
Value – Value defined for the selected header field.
Add button
Sets the value for a header field and adds it to the Document attributes list. Print Utility will set the field to the specified value for each job you send.
Modify button
Changes the selected field's value in the Document attributes list.
Remove button
Deletes the selected field from the Document attributes list. Print Utility will no longer set the field value.