
These common questions are typically associated with Print Utility. If you can't find the answer to your question here, click the Index or Search tab of the Help to search for a specific word or phrase.
How do I add file attributes to DOS ASCII files as routing criteria?
How do I control the order in which Print Utility reads files?
Print Utility now supports zipped files. The contents of zipped (.gz and .z) files will be uncompressed and sent to the spool. If an uncompressed file has a zipped extension, the contents will be read by Print Utility and the data will be processed as the specified file type. When multiple files are present, each file will be treated as an independent data set. After processing, the compressed file will be handled according to the disposition settings specified when you add a file to the spool. Print Utility does not support files created using PKZIP.
You can pause Print Utility from manually sending files to the spool. You might want to pause file spooling for brief periods while you change Print Utility or BARR/SPOOL settings. If you pause a file that is in the process of being added to the spool, its original settings will be sent. Setting changes will only effect jobs waiting to be sent.
Open Print Utility.
From the Manual Spooling tab, click Pause to pause files that were manually added to the spool.
Once Print Utility has been paused, click Remove to remove selected files before they enter the spool, or click Settings to display the Spooling Properties dialog box where you can view or modify the settings of files before they are added to the spool.
Click Continue to resume adding files to the spool.
To send files from Print Utility and receive them in the spool in binary format, you must configure Print Utility to bypass data conversion. BARR/SPOOL typically converts the data to NJE-wrapped Equivalent to the NJE format at the mainframe. The data is typically EBCDIC and is formatted as NJE records, with NJE record headers and NJE file headers. EBCDIC data when it is received, the preferred format for BARR/SPOOL. Some files, however, must not be converted or they will not print properly.
To bypass the conversion, first you must set up Print Utility to send files to the spool, either manually or automatically. When configuring the Print Utility data type, you must select Binary (raw) from the Format tab. This option allows the files to arrive in BARR/SPOOL in their exact, original format.
 For the data to be sent to a printer or file unchanged,
the BARR/SPOOL printer must also be configured to pass
data to the printer without conversion.
For the data to be sent to a printer or file unchanged,
the BARR/SPOOL printer must also be configured to pass
data to the printer without conversion.
With Print Utility, you can delete folders from the Automatic spooling list when they are no longer needed. Complete the following steps to delete an automatic spooling folder.
Open Print Utility.
From the Automatic Spooling tab, select the folder to delete.
Click Remove.
Use the Windows Explorer to delete the folder from the disk.
The PRT utility can be used to create a spool header and simulate a file that has been spooled by a Barr DOS product. The Barr Enterprise Print Server will use the routing criteria found in the header created by the PRT utility. This is very useful when bringing in ASCII files that have no other way of generating routing criteria. To do this, refer to Using the PRT utility and use DOS as the input format.
Complete the following steps to send long file names to the spool with Print Utility.
Open Print Utility.
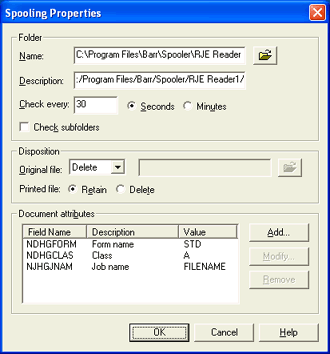
From the Manual Spooling tab, click Settings. The Spooling Properties dialog box displays.
In the Document attributes list, select NJHGJNAM.
Click Modify. The Select Field dialog box displays.
From the Section drop-down list, select Data Set Header User Custom Section/LPD.
Select the NDHDJNAM (Custom job name) field.
Make sure the FILENAME value is assigned. This variable will cause the exact file name to appear in the Document column of the Spool Window. This field has the highest precedence when files enter the Spool Window.
Click OK.
Automatically
add files to the spool. From the Spooling
Properties dialog box, use the following information. 
Select the attribute NJHGJNAM, and then click Modify.
Select the Data Set Header User Custom Section/LPD field NDHDJNAM and assign the value FILENAME. This variable will pick up the name of the file being sent.
Complete the following steps to save the original file in another folder after Print Utility sends it to the spool.
If a folder does not exist, create one using the Windows Explorer.
From the Spooling Properties dialog box, under Disposition, select one of the following options:
Move To – If a file by the same name already exists in the folder, the new file will be saved with an incrementing number. For example, if file ABC is sent to a folder that already contains a file named ABC, the new file will be saved as ABC_001.
Move/Overwrite – If a file by the same name already exists in the folder, the existing file will be replaced by the new file.
Click the folder button and select the desired folder or manually enter the path and folder name. If you enter the path manually, you must enter a backslash (\) character after the folder name. For example, C:\test\.
Click OK.
For automatic spooling, files are moved from the automatic
spooling folder after they are sent to the spool.
In some situations you may want Print Utility to read files from a folder in the same order they were received in the folder (chronological order). Print Utility was designed to read files based on their order in the directory. In most cases this order is alphabetical, not chronological.
Complete the following steps to configure Print Utility to read files from the directory in short time intervals, so that the first file received is the first file read.
Open Print Utility.
On the Automatic Spooling tab, add a new folder or modify the properties of an existing folder.
On the Spooling Properties dialog box, specify the spooling interval next to Check every and then select Seconds or Minutes. Depending on the frequency that files are written to the folder, it may be possible to read them as soon as they are received. We do not recommend setting a time less than 10 seconds because the requested operations may accumulate.
Click OK.
For FAT only:
To ensure that the files on your drive or partition do not become fragmented
and that the directory order always matches the chronological order, dedicate
a drive or a partition for your Print Utility folder. Do not store any
other data on this drive or partition.
Many programs generate Metacode data for Xerox printers. For the Barr Enterprise Print Server to import this data, Print Utility must be configured to import Xerox file formats.
Before you configure Print Utility, you must first determine the record format of the file, either Barr S/370 or VBM Acronym for Variable Blocked with Machine carriage control. This is a standard mainframe file format.. The most common format is VBM. See the Xerox file formats topic for more information on the VBM format. Contact Barr Technical Support for information on the S/370 file format. Once the file record structure is known, Print Utility can be configured to accept the Metacode data.
Complete the steps to add files to the spool. Use the following settings when selecting the file type on the Format tab:
If the file type is VBM, select VBM and Xerox formats.
If the file type is S/370, select Barr DOS (ASCII or S/370).
If a file cannot be sent as the file type specified, the following procedure has been implemented to make sure incorrect files are not sent to the printer.
An attempt is made to send the file to the spool using the Binary file type. If this is not possible or if the file cannot be moved to the destination directory or deleted as appropriate, see #2.
The file is moved to a subfolder of the spooling directory called __ERROR__. Note, there are two underscores before and after the word ERROR. This is a reserved folder name and files will not be spooled from this directory, even if Check subfolders is selected on the Spooling Properties dialog box. If this is not possible, see #3.
Spooling will be disabled for the directory. This will prevent the same file from being sent to the spool multiple times.
You can use Print Utility to assign document attribute values that will populate header fields based on portions of the file name. This is useful when sending long file names to the spool. Complete the following steps from Print Utility to modify a header field value from the Document attributes list.
There are two methods for populating header fields, you can use separator characters (such as underscores) or you can count the characters. Following the procedure is a description and example of each extraction method.
Open Print Utility.
From the Manual Spooling tab, click Settings. The Spooling Properties dialog box displays.
Under Document attributes, click Add. The Select Field dialog box displays.
From the drop-down list, select the section that contains the desired field.
Select the field you want to populate.
Enter the field value. Each field value must contain @filename in the first nine characters. The characters that follow will depend on the extraction method you use. Refer to the following section for a description and example of each method.
Click OK.
Use this method if your file includes separator characters. There are three parameters.
Syntax:
@filename(X, a, b)
|
Parameter |
Description |
|
X |
The value of the separator character, this character can be expressed in decimal or hexadecimal format |
|
a |
The field number (1-N) that contains the characters you want to extract |
|
b |
The number of characters to extract (0=full field length, N=character count) |
Example:
Filename: JobName_Class_Form.PCL
@filename(0x5F, 1, 0) – Extract until the first underscore character (JobName).
@filename(0x5F, 2, 0) – Extract the data between underscores (Class).
@filename(95, 3, 4) – Extract the field length (Form).
Use this method to populate the field by counting the characters. There are two parameters.
Syntax:
@filename(a, b)
|
Parameter |
Description |
|
a |
The position of the first character of the letters you want to extract (1-N) |
|
b |
The number of characters to extract (0=until end, N=character count) |
Example:
Filename: monthyearhourminutes.PCL
@filename(1, 5) – Start extracting at character 1 for a length of 5 (month).
@filename(6, 4) – Start extracting at character 6 for a length of 4 (year).
@filename(10, 4) – Start extracting at character 10 for a length of 4 (hour).
@filename(14, 11) – Start extracting at character 14 for a length of 11 (minutes.PCL).