 Sorting by the job's priority, form, or class automatically
takes precedence over the job's folder name. However, you can choose the
sort order of the priority, form, and class information.
Sorting by the job's priority, form, or class automatically
takes precedence over the job's folder name. However, you can choose the
sort order of the priority, form, and class information.The Add Sort Criteria Wizard leads you through the steps to change the order in which jobs are displayed in the Spool Window and the Retain Window. The sort order determines the order in which jobs are viewed and printed. Although most columns can be sorted, you cannot sort columns that change when a file starts printing (for example, Printer, Document, State, Page Start, Line Start, and Byte Start).
Each print job consists of one or more data sets that always remain with its associated print job. You can sort jobs along with their associated data sets by choosing job header fields. The default job sort criteria, in order, is Priority (NJHGPRIO) and Folder Name (BARR_FOLDER). Job header fields are populated with PDIRs Acronym for Peripheral Data set Information Record. PDIRs include job name, form name, FCB name, and copy information. and job class type, allowing you to also sort by Form (NJHGFORM) and Msg. class (NJHGMCLS).
Sorting by the job's priority, form, or class automatically
takes precedence over the job's folder name. However, you can choose the
sort order of the priority, form, and class information.
 To perform these
tasks, you must have appropriate user
access rights. If you change the sort order when the Retain Window
is open, you must close and
reopen the Retain Window for the new sort order to be applied in the
Retain Window.
To perform these
tasks, you must have appropriate user
access rights. If you change the sort order when the Retain Window
is open, you must close and
reopen the Retain Window for the new sort order to be applied in the
Retain Window.
Use the Add Sort Criteria Wizard to set your sort order by selecting job header fields for the job sort criteria and data set header fields for sorting data sets within jobs. The sort order defined will determine how jobs are grouped in the print queue and the print order. If you receive data through BARR/NJE and want to group data sets within jobs for sorting, follow the instructions for sorting jobs, and then data sets within jobs. If you receive data through sources other than BARR/NJE, such as BARR/RJE, BARR/PRINT CHANNEL, or BARR/PRINT TCP/IP, follow the instructions for sorting jobs and data sets.
You can sort by jobs and data sets by selecting fields from the data set header, job header, or job trailer sections. The sort order defined will determine how jobs are grouped in the print queue and the print order.
Open the Spool Window.
On the menu bar, select View | Sort Order. The Add Sort Criteria Wizard displays.
If the Welcome page has not been disabled, it will be the first page. This page explains how the Add Sort Criteria Wizard will assist you in setting your sort order. Click Next to continue.
The current sort order will display. If you have not already set a sort order, a default sort order will display. To view the sort order as a list, click List View. To view the sort order in an indented tree view, click Tree View. Click Next to continue.
 As you make changes to the sort order, we suggest you
use the initial sort order as a reference. To view the initial sort order,
simply click Back until you return
to your current sort order.
As you make changes to the sort order, we suggest you
use the initial sort order as a reference. To view the initial sort order,
simply click Back until you return
to your current sort order.
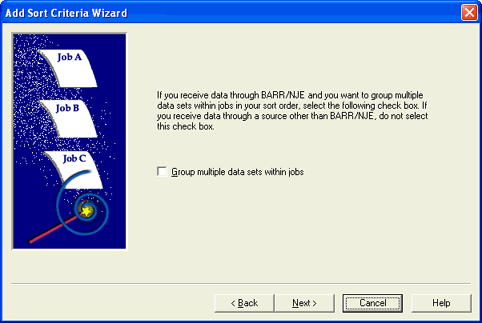
If you receive data through
sources other than BARR/NJE, do not select the Group
multiple data sets within jobs check box. This option allows BARR/NJE
users to sort
jobs, and then data sets within jobs. Click Next
to continue. 
Choose the data set header,
job header, and job trailer fields you want included in your sort order.
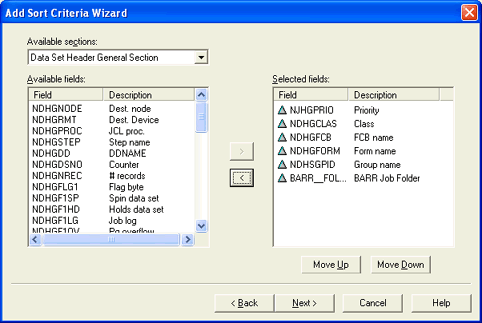
From the Available sections list, select the section that contains the data set header, job header, or job trailer field by which you want to sort.
From the Available fields box, select the desired field. To select multiple fields, use the CTRL or SHIFT keys.
Click the arrow (>) button to move the field to the Selected fields box and add it to your sort criteria. Click the arrow (<) button to remove the field from the Selected fields box and remove it from your sort criteria. The maximum number of sort criteria fields is 15. Because the BARR_FOLDER field is included by default, you can select up to 14 fields. To move a single field between boxes, you can double-click the field name. A drag-and-drop operation is also available to move selected fields to another location.
Click Move Up or Move Down to arrange the fields in the Selected fields box into the desired sort order. A drag-and-drop operation is also available to move selected fields to another location. The BARR_FOLDER field always appears last in the Selected fields box and its position in the box cannot be changed.
To change the sort direction, right-click the field name in the Selected fields box and choose Ascending or Descending. Select Ascending to sort the data with the lowest number, character, or date first. Select Descending to sort the data with the highest number, character, or date first.
Right-clicking the field description displays a menu
with Select All and Deselect
All commands.
When you are finished adding the fields to your sort criteria, click Next to continue.
Review the sort order you created. To view the sort order as a list, click List View. To view the sort order in an indented tree view, click Tree View. Click Back to make any changes. When you are satisfied with the sort criteria you have selected, click Finish. Your sort order is preserved and will be applied until you run the wizard again and make changes.

You can sort the data sets within each job by choosing data set header fields. The default data set sort criteria, in order, is Class (NDHGCLAS), FCB name (NDHGFCB), Form name (NDHGFORM), and Output group name (NDHSGPID). The header fields you select will group the data sets within each job. This grouping will be surrounded by a header and trailer if specified on the Printer Properties dialog box. This type of sorting is appropriate when receiving data through BARR/NJE and you would like to sort by multiple data sets within jobs.
Open the Spool Window.
On the menu bar, select View | Sort Order. The Add Sort Criteria Wizard displays.
If the Welcome page has not been disabled, it will be the first page. This page explains how the Add Sort Criteria Wizard will assist you in setting your sort order. Click Next to continue.
The current sort order will display. If you have not already set a sort order, a default sort order will display. To view the sort order as a list, click List View. To view the sort order in an indented tree view, click Tree View. Click Next to continue.
As you make changes to the sort order, we suggest you
use the initial sort order as a reference. To view the initial sort order,
simply click Back until you return
to your current sort order.
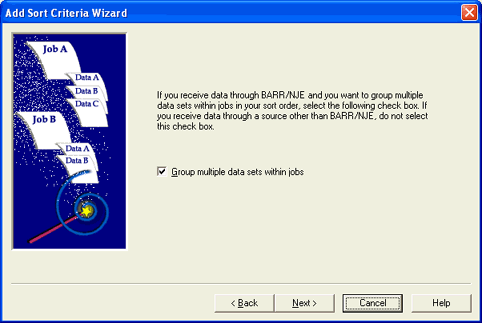
If you receive data through
BARR/NJE and would like to sort by multiple data sets within jobs, select
the Group multiple data sets within jobs
check box. If you choose not to select this option, you will be sorting
jobs and data sets. Click Next
to continue.
Choose the job header and
job trailer fields you want included in your sort order.
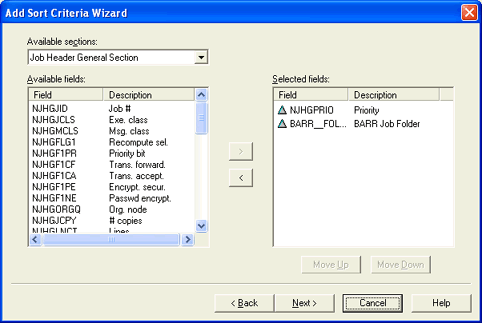
From the Available sections list, select the section that contains the job header or job trailer field by which you want to sort.
From the Available fields box, select the job header or job trailer field. To select multiple fields, use the CTRL or SHIFT keys.
Click the arrow (>) button to move the field to the Selected fields box and add it to your sort criteria. Click the arrow (<) button to remove the field from the Selected fields box and remove it from your sort criteria. The maximum number of sort criteria fields is 15. Because the BARR_FOLDER field is included by default, you can select up to 14 fields. To move a single field between boxes, you can double-click the field name. A drag-and-drop operation is also available to move selected fields to another location.
Click Move Up or Move Down to arrange the fields in the Selected fields box into the desired sort order. A drag-and-drop operation is also available to move selected fields to another location. The BARR_FOLDER field always appears last in the Selected fields box and its position in the box cannot be changed.
To change the sort direction, right-click the field name in the Selected fields box and choose Ascending or Descending. Select Ascending to sort the data with the lowest number, character, or date first. Select Descending to sort the data with the highest number, character, or date first.
When you are finished adding the fields to your sort criteria, click Next to continue.
Right-clicking the field description displays a menu
with Select All and Deselect
All commands.
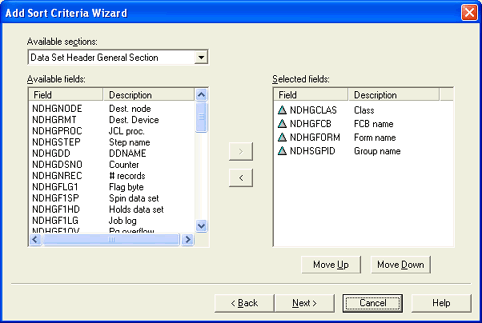
Choose the data set fields
you want included in your sort order.
SYSIN jobs: Selecting the Group
multiple data sets within jobs check box will not affect SYSIN
jobs. All SYSIN jobs will stay intact and in sequential order. When sorting
a SYSIN job, the sort criteria is based only on the first data set in
the job.
SYSOUT jobs: If you choose the SYSOUT counter field NDHGDSNO
as part of your sort criteria, then each data set in a job is treated
as a group. Also, using the Print jobs
while receiving data option on the Spool
Printers tab during group printing can cause the data sets to print
incorrectly (that is, without specified grouping).
From the Available sections list, select the section that contains the data set header field by which you want to sort.
From the Available fields box, select the data set header field. To select multiple fields, use the CTRL or SHIFT keys.
Click the arrow (>) button to move the field to the Selected fields box and add it to your sort criteria. Click the arrow (<) button to remove the field from the Selected fields box and remove it from your sort criteria. To move a single field between boxes, you can double-click the field name. A drag-and-drop operation is also available to move selected fields to another location.
Click Move Up or Move Down to arrange the fields in the Selected fields box into the desired sort order. A drag-and-drop operation is also available to move selected fields to another location.
To change the sort direction, right-click the field name in the Selected fields box and choose Ascending or Descending. Select Ascending to sort the data with the lowest number, character, or date first. Select Descending to sort the data with the highest number, character, or date first.
When you are finished adding the fields to your sort criteria, click Next to continue.
Right-clicking the field description displays a menu
with Select All and Deselect
All commands.
Review the sort order you created. To view the sort order as a list, click List View. To view the sort order in an indented tree view, click Tree View. Click Back to make any changes. When you are satisfied with the sort criteria you have selected, click Finish. Your sort order is preserved and will be applied until you run the wizard again and make changes.