 Before you can use the NJE Console, you must follow
the steps in the Getting started
with BARR/NJE topic and be connected to the host. BARR/NJE operators
must be assigned the NJE Console
user access right.
Before you can use the NJE Console, you must follow
the steps in the Getting started
with BARR/NJE topic and be connected to the host. BARR/NJE operators
must be assigned the NJE Console
user access right.This topic provides information on using the NJE Console.
Before you can use the NJE Console, you must follow
the steps in the Getting started
with BARR/NJE topic and be connected to the host. BARR/NJE operators
must be assigned the NJE Console
user access right.
Once BARR/NJE is configured, it is easy to operate. You simply need to start or stop the BARR NJE service. No interaction is required by the user for the NJE host and remote computer to send and receive files. At the computer, use the NJE Configuration Utility or the Windows services to start and stop BARR/NJE.
You can start BARR/NJE by opening the NJE Configuration Utility or by starting the BARR NJE service.
To stop BARR/NJE, stop the BARR NJE service.

This section lists the procedures for sending commands and messages to the destination node. Follow the steps for the type of command or message you will be sending.
Open NJE Console.
On the menu bar, select Session | Connect.
On the menu bar, select
Session | Set Destination. The
Set Destination Node dialog box
displays. 
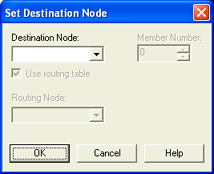
Select or enter a Destination Node. The nodes displayed in the list are defined in the active routing table from the NJE Configuration Utility. If you enter a node that is not defined in a routing table, you must clear the Use routing table box and select the routing node from the Routing Node list.
The name of the current destination node appears in the status bar. All commands and messages entered in the console will be sent to the destination node.
 If a node from the active routing table does not appear
in the list, open the Operator
Console and check for possible BARR/NJE connection errors.
If a node from the active routing table does not appear
in the list, open the Operator
Console and check for possible BARR/NJE connection errors.
Set the Member Number by typing the number in the box or selecting it with the up and down arrows. If you don't know the member number, leave it set to zero.
Click OK.
On the menu bar, select View | Host Command, if not already selected. A checkmark appears next to the item when it is selected.
From the host command view, select Host command or Message. If you are sending a host message, you must also select a priority from the drop-down list.
When sending a message,
the selected priority will be assigned to the message when it is transmitted
to the destination node. Many systems ignore the message priority and
use it for informational purposes only. NJE Console uses this priority
on incoming messages, and it can provide audible notification to the local
console operator, configured on the Preferences
tab.
Enter a host command or message in the box and press ENTER. This will send the host command to the selected destination node or the host message to the operator console on the destination node. You can ensure that the message was sent correctly by verifying that the text you entered displays on the destination node’s operator console.
If you are communicating with the host using a POWER connection,
global commands are not supported.
On the menu bar, select View | Global Command, if not already selected. A checkmark appears next to the item when it is selected.
From the Global Command drop-down list, select one of the commands.
Enter the Job name for the job on the destination node.
Select Job description to further identify the job on the destination node. If you select this option, you can also specify the Job ID and Originating node.
Click Send. This will send the global command to the selected destination node.
The contents of the NJE Console can be written to a log file. The log file is a text file that includes messages from the host, commands sent to the host, diagnostic messages from the Barr software, and other program activity.
To create a log file for a new NJE Console session, on the menu bar, select File | Save. Specify where you want to store the log file. Use the Save As option if you do not want to overwrite an existing console log in the same session.
 For easy reference, we recommend that you
create a log folder to store your NJE Console log files.
For easy reference, we recommend that you
create a log folder to store your NJE Console log files.
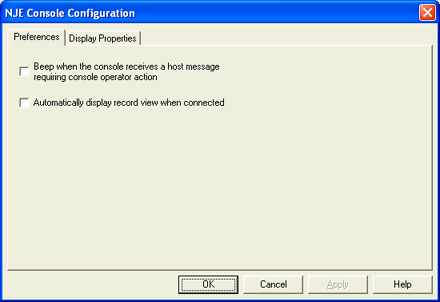
You can configure your preferences and display properties for the NJE Console window. Compete the following steps.
Open NJE Console.
On the menu bar, select Session | Configuration.
From the Preferences
tab, select the appropriate boxes if you want the console to beep
when receiving host messages that require operator action, or want the
record view to automatically display at connection.
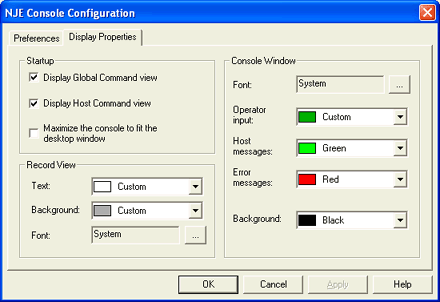
From the Display
Properties tab, set up how you want the NJE Console to appear. Select
window properties for startup, such as view types to display and window
size. You can also select font type and colors for the record view and
console window.
The trace option is available only for Barr
SNA connections. For SNA connections, you can capture MS/LUA traces from
either Microsoft SNA Server or HIS. Refer to the appropriate Microsoft
Help for more information.
You can use the NJE Console to capture a trace for Barr SNA connections, 802.2, HPR/IP, and SDLC. If you have trouble operating BARR/NJE and contact Barr Technical Support, a support analyst may request that you create and send a trace file to determine the cause of the problem.
Open the NJE Console.
On the menu bar, select Trace | Start, or click the Start Trace toolbar button.
Perform the operation that you want to trace.
To stop writing BARR/NJE operations to the trace file, on the menu bar, select Trace | Stop. Or, click the Stop Trace toolbar button. The trace file will be saved in the \\Program Files\Common Files\Barr\Trace folder.
To
minimize the chance of losing important data while viewing the current
trace information, click the Stop Trace
toolbar button, and then immediately click the Start
Trace toolbar button to continue tracing.
The trace option is available only for Barr
SNA connections. For SNA connections, you can capture MS/LUA traces from
either Microsoft SNA Server or HIS. Refer to the appropriate Microsoft
Help for more information.
To clear the contents of the trace file, on the NJE Console menu bar, select Trace | Clear, or click the Clear Trace toolbar button. If you are troubleshooting a specific operation, it can be helpful to clear the trace file before you perform the operation. That way, the trace file will not contain extraneous information.