 To add a Windows printer, you must be a member of either the
Administrators, Printer
Operators, or Server Operators
group or you must be a Power User
on a workstation.
To add a Windows printer, you must be a member of either the
Administrators, Printer
Operators, or Server Operators
group or you must be a Power User
on a workstation.This procedure lists the steps necessary for manually creating printers to print to an S/390 channel-attached printer, print to a TCP/IP print queue, route files to another BARR/SPOOL, write files to a TCP/IP socket, or write files to disk. For procedures on printing to alternate locations, see the Getting started with printers topic. The steps vary depending on your operating system.
To add a Windows printer, you must be a member of either the
Administrators, Printer
Operators, or Server Operators
group or you must be a Power User
on a workstation.
 LPR does not support spaces in file names. File names sent
by LPR will be truncated at the first space. Consider replacing spaces
in file names with underscores ( _ ).
LPR does not support spaces in file names. File names sent
by LPR will be truncated at the first space. Consider replacing spaces
in file names with underscores ( _ ).
Complete the following steps to add the Barr port.
Open the Windows Add Printer Wizard.
Select to define a local printer. Click Next.
Create a new port, selecting the appropriate Barr port.
Barr PRINT390 Port – Prints to an S/390 channel-attached printer.
Barr LPR Port – Prints to a TCP/IP print queue or routes files to another BARR/SPOOL.
Barr IP Port – Writes files to a TCP/IP socket or prints to a Xerox EPS.
Barr File Port – Writes files to disk.
Type the Port name, and then click OK.
 Include the port
type and number in the port name so you can easily identify the ports
later. To group all the Barr ports together in the ports list, include
Barr as the first word of each
port name.
Include the port
type and number in the port name so you can easily identify the ports
later. To group all the Barr ports together in the ports list, include
Barr as the first word of each
port name.
After you assign the port name, a dialog box displays so you can configure the port settings. To configure the appropriate Barr port, specify parameters on the associated tab pages and dialog boxes.
Barr File port - File Options tab and File Format tab
Barr IP port - IP Configuration tab and File Format tab
Barr LPR port - Job tab, Content tab, and Advanced tab
Barr PRINT390 port - Port Configuration dialog box
From the Manufacturers and Printers lists, select the appropriate printer driver. See the following table.
|
Printing Type |
Manufacturers |
Printers |
|
Printing to a channel printer |
Barr |
Barr PRINT390 - Printer Driver |
|
Printing to a TCP/IP print queue |
Barr |
Barr ASCII - Printer Driver |
|
Print to a Xerox EPS |
Barr |
Barr ASCII - Printer Driver |
|
Routing to another BARR/SPOOL |
Barr |
Barr ASCII - Printer Driver |
|
Writing to a TCP/IP socket |
Barr |
Barr ASCII - Printer Driver |
|
Writing to disk |
Barr |
Barr ASCII - Printer Driver |
Select Keep existing driver. Click Next.
Type the Printer name as you want it to appear in the Windows Printers folder. Choose whether or not to use this printer as your default printer. Click Next.
Choose whether or not this printer will be shared with other network users. If this printer will be shared, you will need to type a share name. Click Next.
To set up a printer
for sharing, the printer and users who will access it must be in the same
domain. You must assign corresponding printer permissions from the Security tab of the shared printer’s
Properties dialog box.
If the Windows printer is shared, you cannot select the Bypass
the Windows spooler option on the Advanced
Printer Options dialog box for the associated spool printer.
Choose whether or not to print a test page. Click Next, and then click Finish. The new Windows printer displays in the Printers folder. To define another printer, open the Printers folder and select Add Printers.
If you selected the Barr ASCII - Printer Driver, complete the following steps to configure the document defaults.
From the Printers folder, right-click the printer you just defined using the Barr ASCII printer driver and select Properties.
From the Advanced tab, click Printing Defaults.
Expand the Document Options tree and set Top Margin to Off. This setting affects the extra blank line automatically sent by the GDI Acronym for Graphical Device Interface. In Windows, a graphics display system used by programs to display or print bitmapped text (TrueType fonts), images, and other graphical elements. within Windows. See the Troubleshooting printers topic for more information.
If you want to ignore all of the page breaks in the data, job, or FCB definition, set Page Breaks to Off.
Click OK.
If you are printing to a channel printer or to a TCP/IP print queue, select the physical printer type.
Printing to a channel printer – Select the PRINT390 or mainframe physical printer type.
Printing to a TCP/IP print queue – Select the ASCII printer type.

The options you specify for a spool printer affect all documents you send to it.
From the Configuration
Utility’s Spool Printers tab, click
Add. The Printer
Properties dialog box displays. 
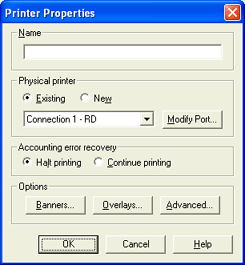
In the Name box, enter a printer name. The printer name cannot contain a backslash '\'. This name displays in the Spool Window’s printer list and is called the spool printer.
Under Physical printer, select Existing. From the drop-down list, select the printer you just defined. The spool documents will be routed to this physical device.
Click Banners to select the header and trailer files and how they will be applied to print jobs (optional). The Banner Options dialog box displays.
Click Overlays to setup overlays and configure how they will be applied to print jobs (optional). The Overlay Options dialog box displays.
If you are printing
to an IBM 3800 printer in compatibility mode, you must select the doc.tnj overlay file. The default directory
is \\Program Files\Barr\Spooler\Overlay, unless an alternate path was
specified during installation.
Click Advanced.
The Advanced Printer
Options dialog box displays. Review the following table to select
the required and desired options.
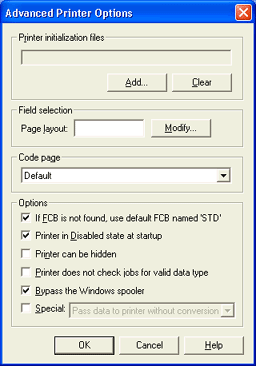
|
Options |
Channel Printer |
TCP/IP Print Queue |
Another BARR/SPOOL |
IP Socket or Disk |
|
Printer initialization files |
Optional |
Optional |
Don't Use |
Don't Use |
|
Page layout |
Don't Use |
Don't Use |
Don't Use |
Don't Use |
|
Code page |
Optional |
Optional |
Don't Use |
Optional |
|
If FCB is not found, use default FCB named 'STD' |
Optional |
Optional |
Don't Use |
Optional |
|
Printer in Disabled state at startup |
Optional |
Optional |
Optional |
Optional |
|
Printer can be hidden |
Optional |
Optional |
Optional |
Optional |
|
Printer does not check jobs for valid data type |
Optional |
Optional |
Don't Use |
Optional |
|
Bypass the Windows spooler |
Required |
Optional |
Optional |
Required |
|
Special: Pass data to printer without conversion |
Don't Use |
Don't Use |
Don't Use |
Don't Use |
|
Special: Pass the archive format to LPR port |
Don't Use |
Don't Use |
Required |
Don't Use |
|
Special: Printer uses transform |
Don't Use |
Optional |
Don't Use |
Optional |
Close the Configuration Utility.