 If
you have not already done so, follow the procedures in the Getting
started with BARR/RJE topic to configure the host and software.
If
you have not already done so, follow the procedures in the Getting
started with BARR/RJE topic to configure the host and software.If
you have not already done so, follow the procedures in the Getting
started with BARR/RJE topic to configure the host and software.
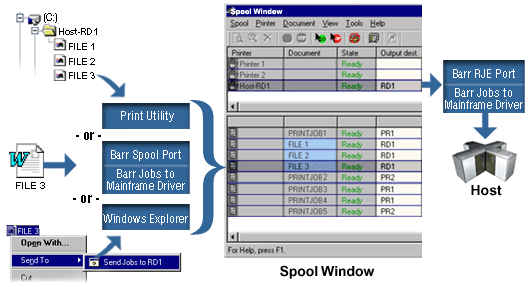
To send SYSIN files to the host, files must be routed into BARR/SPOOL. This can be done by printing from a program, configuring Print Utility to automatically route files from a specified folder, or manually adding files to the spool with the Windows Send To option.
There are two methods for configuring BARR/SPOOL to route files to the host. This can be done automatically for you when you finish configuring your RJE connection, or you can do this manually by configuring Print Utility, printers, and the Spool Window. A spool printer must be created to send the files from BARR/SPOOL to the host. To send the jobs, the routing criteria (Output dest. field) for both the jobs and the printer must match.
Use the following procedures to manually route files into BARR/SPOOL, configure a spool printer, and configure the Barr software to send files to the host.
If your files require special processing (such as files with long records, binary data, or files that require BARR/TRAN processing), refer to the Sending JCL files with an embedded command topic. Using embedded commands adds flexibility to the existing BARR/RJE functionality. BARR/TRAN provides extended file transfer capabilities, including longer record length, variable length records, and so on.
 If
you were sending starting and ending JCL files in the BARR/RJE DOS product,
you must contact Barr Systems
Technical Support for information on how to use this feature in the Barr
Enterprise Print Server.
If
you were sending starting and ending JCL files in the BARR/RJE DOS product,
you must contact Barr Systems
Technical Support for information on how to use this feature in the Barr
Enterprise Print Server.
Complete the following steps to send jobs to the host.
Send jobs to the spool
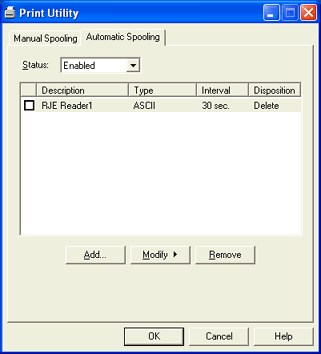
To send JCL (SYSIN) jobs to the host, we recommend that you set up Print Utility to automatically search a specified folder for SYSIN jobs. To automatically add files to the spool, you need to create folders and specify the spooling interval. You can automatically add local and LAN files.
If you have installed BARR/RJE, Print Utility is automatically configured for RJE printing by setting the folder to \\Program Files\Barr\Spooler\RJE Reader1, the file type to SYSIN data (JCL), and the NJHGPRTR field to RD1. Use the following procedure to configure additional Print Utility settings, such as selecting a code page and setting the spooling interval.
 You can also manually add
files to the spool with Print Utility.
You can also manually add
files to the spool with Print Utility.
If you are adding local files, skip to step 2. If you are adding files from a network, configure the BARR Print Utility service to log on as a user rather than a system account A predefined local account used by system processes. This account is only recognized on the local computer and cannot be used to access network resources relying on NT LAN Manager (NTLM) authentication.
Open the Services utility.
Select the BARR Print Utility service, and on the menu bar select Action | Properties.
Select the Log On tab. If a system account is selected, we recommend you uninstall and then reinstall the software selecting the user account type. If you are unable to uninstall and reinstall the software, you can configure the service to log on as a user account.
If it doesn't already exist, use the Windows Explorer to create a folder for the SYSIN jobs. Print Utility will use this folder for automatic spooling. We recommend creating \\Program Files\Barr\Spooler\RJE Reader1, if it doesn’t already exist. This is the folder that Print Utility is configured to monitor by default. Copy the necessary SYSIN jobs into the folder.
Open Print Utility.
From the Automatic
Spooling tab, click Add. 
Navigate to the folder you just created. Click OK. The Input Data Conversion Utility displays.
On the Format tab, select SYSIN data (JCL) as the file type.
If you are sending a raw data file, under JCL files select the beginning and ending JCL files, the send mode, and length (if necessary). If your file is a JCL file, you can leave these fields blank.
Begin - The beginning JCL file that is sent immediately before each data file. The file must be in a separate directory from the data file. Click the folder button to select the file, or enter the path and file name in the text box.
End - The ending JCL file that is sent immediately after each data file. The end file must be in a separate directory from the data file. Click the folder button to select the file, or enter the path and file name in the text box.
Mode - Determines the format of the data. See the Format tab for a description of each option.
Length - The record length that can be specified in the following send modes: A, TF, TDF, and TBF. The default value is 80.
On the Options tab, select an output statement and configure headers from data if necessary. We do not recommend using the Output statement and Headers from data options together. If you want to use both of these options, select your settings carefully.
If needed, click Code Pages and choose an ASCII or EBCDIC code page from the Select Code Pages dialog box.
Click OK.
The Spooling Properties dialog
box displays.
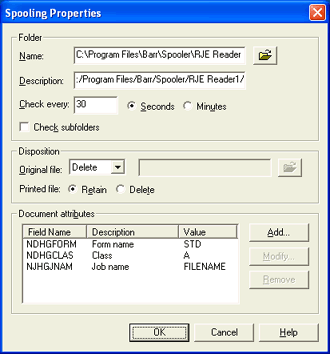
Under Folder, verify the correct folder Name is displayed.
Enter a folder Description that will display on the Automatic Spooling tab.
To specify the spooling interval, enter a value next to Check every and select Seconds or Minutes.
Select Check subfolders to check the subfolders for automatic spooling.
Select the disposition for the Original file. You can select to leave the file, delete the file, or move the file to another folder.
Select the disposition for the Printed file. You can either retain the file or delete the file.
Specify the document attributes. Print Utility sets these fields to specified values before sending a copy of each file to the spool. If you are using the default RJE.ctr file, this has been configured automatically.
Click Add. The Select Field dialog box displays.
From the Section drop-down list, select the Job Header General Section and select the NJHGPRTR field. Set the field value equal to RD1. This will set the job's destination device to be RD1 in the Spool Window. Click OK.
Click OK twice.
If it is not already selected, set the automatic spooling Status to Enabled. This option is available only when the BARR Print Utility service is started.

You can manually add a file to the spool using the Windows Send To list. The Send To option is a quick way of sending files to the spool. A SendTo folder and program shortcut to RD1, the input device that accepts files, is automatically created in your Windows All Users folder when you install the Barr product. The program shortcut, however, must be placed in your specific user name’s Send To folder for the feature to work.
You must set up the Send To option for your user profile.
The Send
To option uses the print file settings specified in the default
control file, RJE.ctr. If
you want to manually add a file using a different control file, add
the file with Print Utility.
Open Windows Explorer.
Navigate to C:\Documents and Settings\All Users\SendTo, where C is your hard drive.
From the SendTo folder, right-click Send Jobs to RD1 and select Copy.
Navigate to C:\Documents and Settings\Username\SendTo, where C is your hard drive and Username is your username’s profile folder.
The Send
To option only functions after you have set up the program shortcut
in your username’s SendTo folder.
Open Windows Explorer, if it is not already open.
Browse to the file you want to send to the Spool Window.
Use one of the following methods.
Select the file. On the menu bar, select File | Send To | Send Jobs to RD1.
Right-click the file and select Send To | Send Jobs to RD1.
Spool files are read-only. When you send a
spool file to a program with the Send
To option, you can only save the file using the program's Save As option, not Save.
Once you have defined a spool printer for printing the jobs to the host, and configured Print Utility to send jobs intended for the host to the Spool Window, you are ready to send jobs to the host from the Spool Window.
If you have installed BARR/RJE, the default configuration file is RJE.bsp. This file automatically configures the Spool Window for RJE printing by adding the Output dest. column to the Spool Window.
Complete the following steps to send a job to the host from the Spool Window.
Open the Spool Window.
If the Output dest. column is not displayed, add it to the Spool Window. This field, NJHGPRTR (Output dest.), is contained in the Job Header General Section. If you are using the default RJE.bsp file, this has been configured automatically.
Disable the spool printer.
Double-click the Output dest. column for your printer, type RD1, and then click OK. This is the value specified when you configure the document attributes in Print Utility.
To print the document, set the document and printer criteria to match in the Spool Window, and change their states to Ready. The document will display a Printing state. After printing, the job will disappear. Check your host's output queues for the job.
When SYSIN jobs are added to the Spool
Window, they appear shaded in a light blue background.